If you plan to make a YouTube video or other content using bootlegs downloaded from our site, although we can't and won't force you to do anything, we greatly appreciate attribution for the large amounts of time and effort we spend finding these bootlegs. Thank you! |
Talk:Main Page: Difference between revisions
Undefishin (talk | contribs) No edit summary |
Undefishin (talk | contribs) No edit summary |
||
| Line 113: | Line 113: | ||
Desktop (If any reboots are required (which is the case most of the time in bootlegs with WPIs), then that makes it a Desktop on First Boot portion, otherwise it's just a Desktop portion) |
Desktop (If any reboots are required (which is the case most of the time in bootlegs with WPIs), then that makes it a Desktop on First Boot portion, otherwise it's just a Desktop portion) |
||
Start Menu (The start menu of the default theme) |
Start Menu (The start menu of the default theme) |
||
Demo (A Demo portion involves two or three windows, but these two are paramount: System Properties (you can access the dialog in the Control Panel or typing <code>sysdm.cpl</code> in the Run dialog), About Windows (you can access the dialog by running winver.exe in the Run prompt or going to My Computer, clicking Help and then About). You can also include the Run dialog itself) |
Demo (A Demo portion involves two or three windows, but these two are paramount: System Properties (you can access the dialog in the Control Panel or typing <code>sysdm.cpl</code> in the Run dialog. You may put the support information if you wish), About Windows (you can access the dialog by running winver.exe in the Run prompt or going to My Computer, clicking Help and then About). You can also include the Run dialog itself) |
||
Autorun (If the bootleg has a custom one) |
Autorun (If the bootleg has a custom one) |
||
</pre> |
</pre> |
||
| Line 119: | Line 119: | ||
What is also important to capture are the themes of a bootleg, as there are many bootlegs with many themes (and we do mean many, there are known bootlegs with more than 100 themes), so this is how to deal with it: |
What is also important to capture are the themes of a bootleg, as there are many bootlegs with many themes (and we do mean many, there are known bootlegs with more than 100 themes), so this is how to deal with it: |
||
You must take a screenshot of the theme by applying the theme in the theme selector, |
You must take a screenshot of the theme by applying the theme in the theme selector, then close the theme selector dialog, then you open the start menu and then capture the screenshot. |
||
As for labeling it, you do it like this: <code>(prepend your OS name from your previous screenshots)_(Theme Name)_Theme.png</code> |
As for labeling it, you do it like this: <code>(prepend your OS name from your previous screenshots)_(Theme Name)_Theme.png</code> |
||
Revision as of 07:39, 7 February 2023
dont forget sigs ~~~~
+ means free spot to write things in, but doesnt mean they're the only places. its just there for others if they can't decide where to write. The standards should be very lax in what you can do and not do, but the syntax should be consistent at the core level to alleviate a large-scale problem on consistency. you can write other things in but dont change the syntax too much -undef
Article formatting [unfinished]
(BOOTLEG INFOBOX. Anything that is optional will be marked as such, otherwise it is mandatory and cannot be removed, no exceptions. (unless its archive add date in which case, it has not been tracked extensively, only very recently. if you cant find the exact date ask others about it, otherwise dont include it.))
{{Infobox bootleg
|title =
// optional. (you can remove the title it'll just use the article name instead -undef)
|collection_name=Windows
// collection name. (optional, use windows, linux, ms-dos, the rest -undef)
|screenshot = (PUT SCREENSHOT HERE)
// desktop screenshot (screenshot criteria NIY)
|screenshot_size = 250px // optional
|screenshot_alt = // optional
|original_os = [[:Category:Bootlegs based on Windows (OS NAME HERE)|Windows (OS NAME HERE)]]
// original os. (use category links instead of seperate articles -yellows)
|forked_from =
// use for bootleg fork, (optional -undef)
|release_date = 20
// after release date add year number -undef
|creator =
// bootleg creator(s). (if the bootleg creator/group has made more than 2 bootlegs, make it a link to their own category -undef)
|country =
// countr(ies). (optional -undef)
|language =
// system language(s). (include multiple languages if bootleg has different regional language or it has software in other languages -undef)
|arch = x8
// architecture(s). (arch format: x86 (16-bit) x86 (32-bit) x86 (64-bit) -undef)
|othervers =
// other bootleg version(s). (optional -undef)
|size =
// file size(s). (size format: X.X Y (#.# floating number, Y size unit (in capitals)) -undef)
|download = []
// download link(s). (use <wbr> when necessary -yellows)
|archiveadd =
// archive addition date -undef (date format (oh boy): Month Day (ordinal), Year) (-undef)
}}
(Bootleg name) (also known as/otherwise known as+ (other name(s)) is a bootleg (Windows edition/Linux distribution) created by (author name, reference from infobox)+ released in (year, reference from infobox)+ and added to the archive on (add date, reference from infobox)
=== Description === (optional) The bootleg is a modified (OS Name & Service Pack, reference from infobox) (Language) + ISO (describe the purpose of the bootleg and what is added and what is removed, along with other tidbits)
The ISO was made using (SOFTWARE) on (OS IF SPECIFIED) (optional).
+ (If there is anything of note to be mentioned in the description, put it here otherwise put it in notes)
Changes from (Original OS)
(use * as prefix to make a listing. this is to be done with software and notes)
(you can include anything that is changed, but if you find it particularly difficult to find good places to document, some good places to look are text-mode and graphical setup, boot screen, OOBE, login, desktop, software, skins and small tidbits)
=== Software === (if there is no software optional)
- (Software listing goes here. The software list should be sorted alphabetically and by software type. seperate software types with newlines, but if the type is: customization utilities, updates, redistributables, mark them with their own sections.)
=== Notes === (if theres nothing of note to put optional)
- (particularly interesting things go here)
Gallery
<gallery> SCREENSHOT CRITERIA NIY </gallery>
Linux articles
Do we really count Linux as bootlegs? its crusty, sure but bootleg? that's debatable Yellows111 (talk) 12:55, 4 January 2023 (UTC)
- Counter-point: Windows 12 Lite exists, so i'm not sure what to say about this topic. Huh. Yellows111 (talk) 16:03, 4 January 2023 (UTC)
Template
This talk page or the contents of it may not meet the wiki standards. You can help the CrustyWindows Wiki immensely by expanding, rewriting or removing this talk page. |
This talk page or the contents of it may not meet the wiki standards. Reason goes here You can help the CrustyWindows Wiki immensely by expanding, rewriting or removing this talk page. |
Screenshot Criteria Discussion
Version 1
- If stock assets are used, do not bother capturing, if filler is needed, then this clause can be changed to "use the template image of File:X_Y_(Stock)"
A gallery must not use the same image as the infobox's screenshot parameterNo longer affected with recent changes.- Never use the same image twice (EXCEPT the infobox image). Doing such will break galleries. Nobody wants that.
- by Yellows111 (talk) 13:31, 1 February 2023 (UTC)
Template Standards
- If you use an image for the love of all crust in the sky PLEASE make your file references have a empty link parameter. ([[File:whatever.png|link=]])
- Not doing the above makes the template image able to be clicked on and thus previewed by MediaViewer. This makes for a bad user experience where the first image can be a random icon.
Yellows111 (talk) 13:38, 1 February 2023 (UTC)
How To Capture Screenshots For Your Bootlegs: A Guide Concerning Labels And Places To Capture [unfinished]
All screenshots must be captured in PNG format, taken from a VM screen (doesn't matter what hypervisor or site you use, using a capture card with a physical machine is fine, but no VHS rips (just why?)) and if the screenshot is taken from a hypervisor, be cropped to just the VM screen (for obvious reasons).
You can use any screenshot program for screen capture, preferably the hypervisor's screenshot function if it has it, and any hypervisor or site for testing the bootleg. Although you can just use the Install Any OS VMs, using a virtual machine is highly recommended, as you don't have to deal with distractions and disruptions from any potential troublemakers, and you get a higher quality picture as it's not compressed by CollabVM itself.
As for labeling your screenshots, and good places to look for capturing, this is how to label your screenshots:
(Original OS Name)_(Bootleg OS Name)_(Portion).png
Example: XP_MagartRedivo2010_DjKhaledTheme.png
Vista_GanjaEdition_Desktop.png
And as for places to look, you shouldn't have too much of an issue finding places to look, but if you can't for the life of you find any good places, or is just unsure on where to start, here are a few good places to look:
This is assuming you are writing for an XP bootleg.
You must order the screenshots in the gallery in the way that the portions down below are ordered. You can only take one of each screenshot, and if there are multiple sections of one portion, it doesn't exclude it from capture.
Pre-boot selector / Boot selector (If it exists)
Text-mode setup (Partition screen, Format screen, Copying screen)
Graphical setup
Boot screen
Pre-OOBE (In most bootlegs with stripped OOBEs, this part will almost always be here)
OOBE (If it exists)
Post-OOBE (Login screen)
Post-Login (Anything that is set to run on startup, such as a WPI, post-install script, or other such)
Desktop (If any reboots are required (which is the case most of the time in bootlegs with WPIs), then that makes it a Desktop on First Boot portion, otherwise it's just a Desktop portion)
Start Menu (The start menu of the default theme)
Demo (A Demo portion involves two or three windows, but these two are paramount: System Properties (you can access the dialog in the Control Panel or typing <code>sysdm.cpl</code> in the Run dialog. You may put the support information if you wish), About Windows (you can access the dialog by running winver.exe in the Run prompt or going to My Computer, clicking Help and then About). You can also include the Run dialog itself)
Autorun (If the bootleg has a custom one)
What is also important to capture are the themes of a bootleg, as there are many bootlegs with many themes (and we do mean many, there are known bootlegs with more than 100 themes), so this is how to deal with it:
You must take a screenshot of the theme by applying the theme in the theme selector, then close the theme selector dialog, then you open the start menu and then capture the screenshot.
As for labeling it, you do it like this: (prepend your OS name from your previous screenshots)_(Theme Name)_Theme.png
Screenshot examples:
-

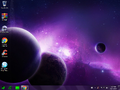
A clean desktop screenshot at default configuration.
-
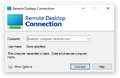
A screenshot that should definitely not be in an article. (Its pretty self-explanatory why)


Program screenshots
You can use a program like AeroShot (or AeroShotCRE) to capture programs in a more professional way by only including the window.
Screenshot examples:
-
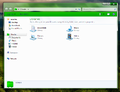
With AeroShot
-
Without AeroShot

